Most people start a custom gift bag order from the artwork and work outward. The printer starts from a different place: how many bags you need and what the design demands. Those two questions decide which printing process makes sense, and the process in turn shapes your cost, your minimum order, and how faithfully your logo lands on the bag. If you understand the four common methods before you request a quote, you can specify a bag that looks right and prices right instead of paying premium-process money for a job a cheaper method would have nailed.
Start with the run size, not the logo
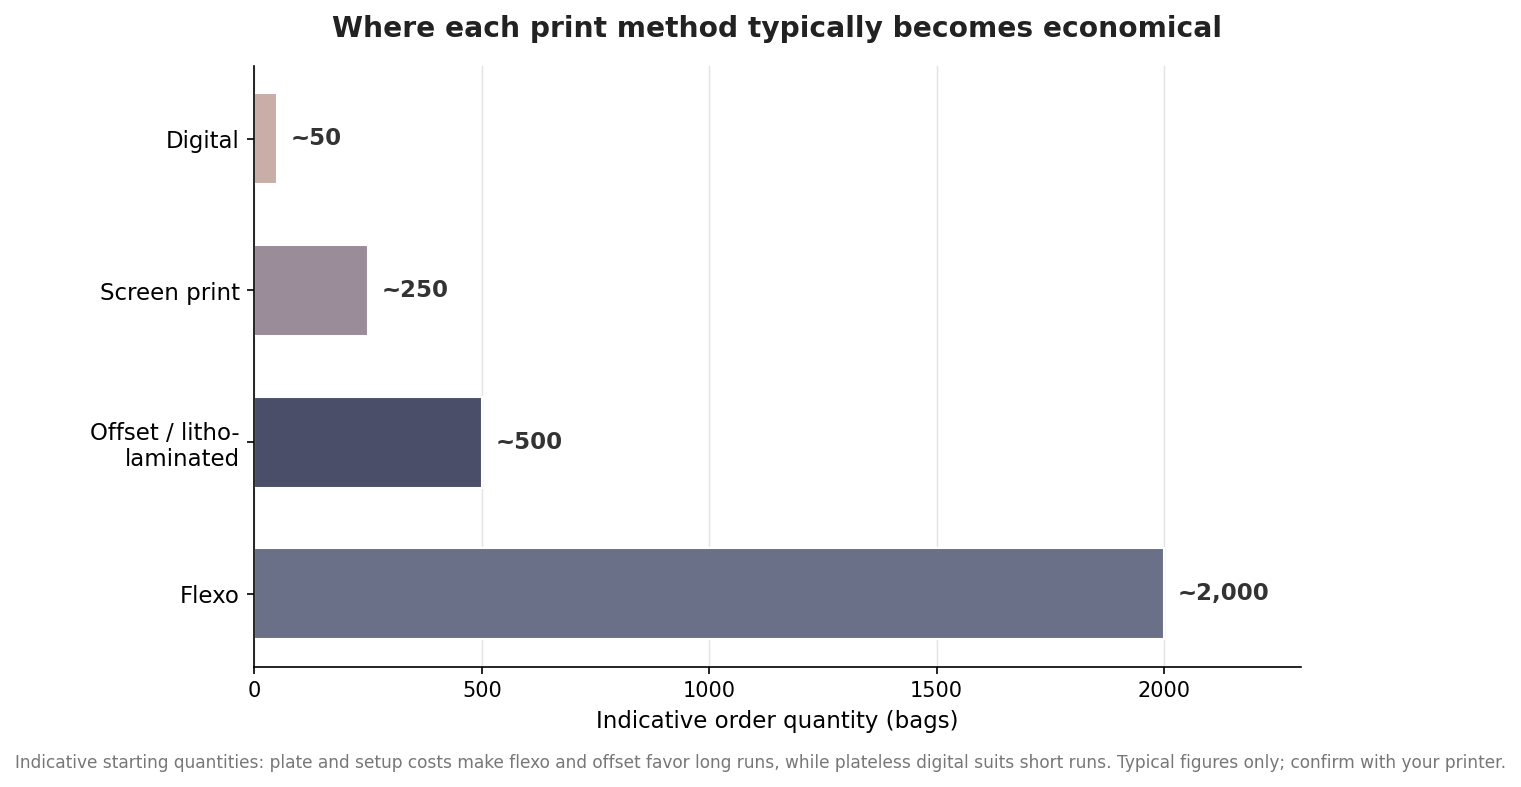
Every printing method carries a fixed setup cost and a per-bag cost, and the balance between them is what decides the economical choice. Methods that need a physical plate or die spread that setup over the run, so they only get cheap once the quantity is large. Plateless methods skip the setup but cost more per unit, which makes them the sensible pick for short runs. Before comparing looks, place your order on that spectrum, because a beautiful process at the wrong volume is simply an expensive one.
The four ways a bag gets printed
Flexography, or flexo, presses ink from a flexible raised plate directly onto the paper, usually the unbleached kraft used for grocery-style and everyday retail bags. It is fast and, at high volume, the cheapest option per bag. The trade-off is detail: flexo handles bold logos and a few solid spot colors well, but it struggles with fine lines, small text, soft gradients, and photographic images. It is the right call when you are ordering thousands of bags with a clean, simple mark.
Offset, most often delivered as litho-lamination, prints your art with high fidelity onto a sheet that is then laminated to the bag. This is the process behind glossy, full-color boutique and gift bags, because it reproduces small text, fine lines, gradients, and full-color artwork cleanly. The catch is setup: plates and lamination raise both the cost and the lead time, so offset rewards larger premium runs rather than a quick fifty-bag job.
Digital printing uses no plate at all, so there is little setup cost and turnaround is quick. That makes it the natural fit for short runs, test batches, and jobs with changing artwork, and it now handles full color respectably. Its weakness is scale: because the per-bag cost barely drops with volume, digital loses to flexo and offset once you are into the thousands.
Screen printing pushes ink through a mesh stencil and lays down thick, vivid spot color, which looks especially good as a one- or two-color logo on a natural kraft bag. It sits in the middle on setup and does not reproduce gradients or photographs, so it suits bold, limited-color branding on small to medium runs rather than detailed imagery.
Finishes are a separate decision
Foil stamping and embossing are not printing methods; they are finishing steps applied on top of, or instead of, printing, and they each need their own tooling. Foil stamping presses metallic foil from a heated die and is built for logos and short brand names rather than full images, with a minimum line thickness so fine details do not drop out. Embossing uses a matched pair of molds to press a raised, tactile shape into the paper, which reads as premium but needs a thicker stock to hold the impression and does not carry complex detail. Both add cost and production time, and both push you toward heavier paper, which is why the finish you want and the paper weight you choose are really one decision.
Choosing the paper weight
Paper weight is measured in grams per square meter, or gsm, and it governs how sturdy the bag feels and how much it can carry. Lighter kraft bags around 130 to 150 gsm are the cost-efficient choice for light contents such as folded apparel, but they are not built for heavy items or for decorative finishing. Standard retail and boutique bags typically move up to the 230 to 250 gsm range, where the bag feels substantial and can take basic foil work. Around 250 gsm is the common all-round sweet spot: it offers strong load capacity, handles heavier or multiple items, and works with virtually any finish. Luxury bags run from 250 up toward 300 gsm on white or specialty stock for the richest hand.
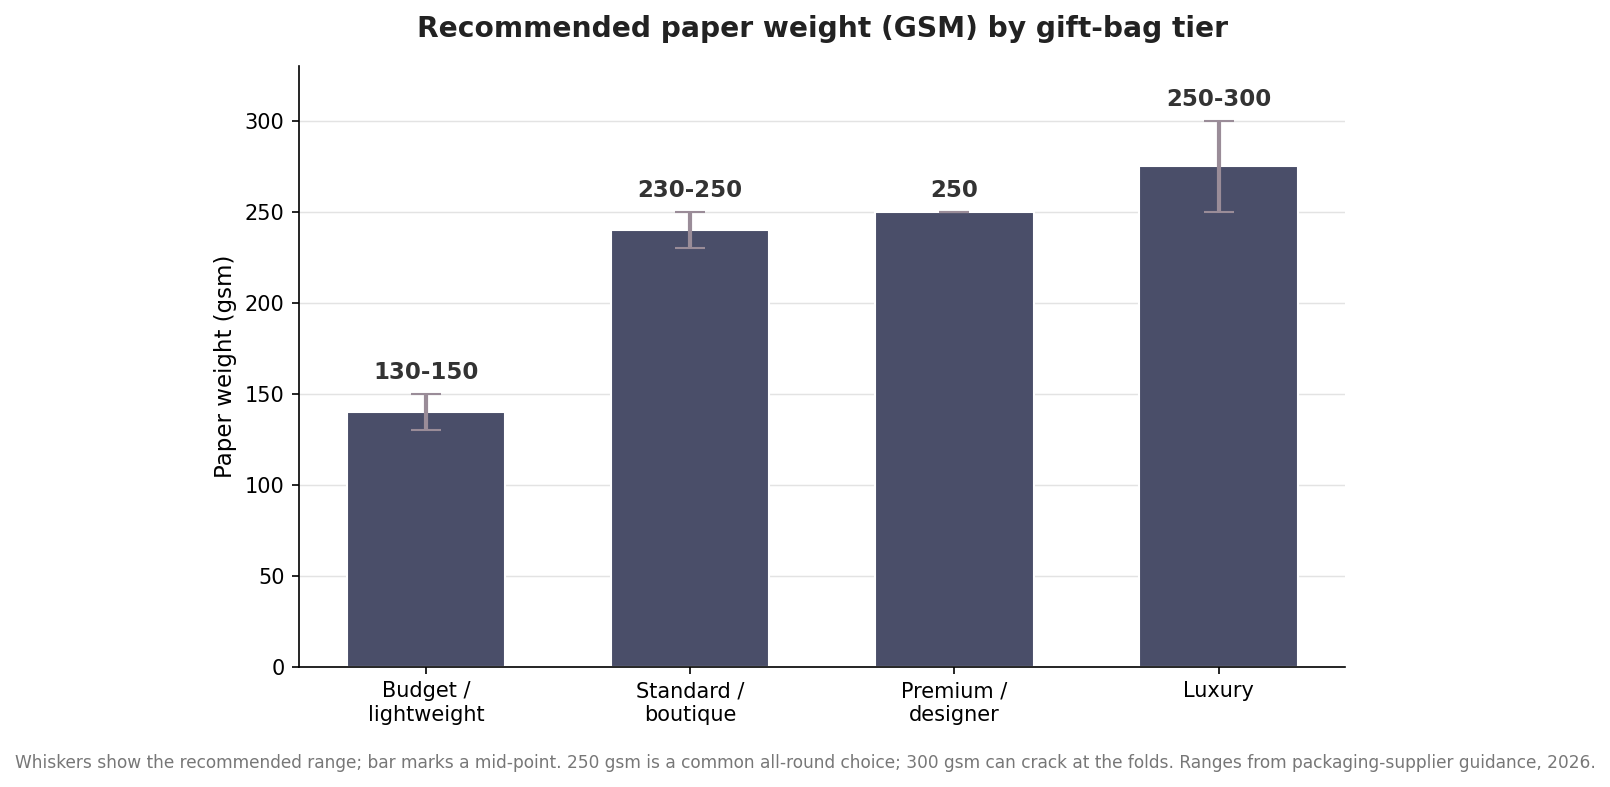
It is tempting to assume heavier is always better, but that is where buyers overspend. Pushing to 300 gsm buys little real strength over 250 and introduces a practical problem: the very stiff board is prone to cracking along the fold lines during manufacturing, which can leave visible white lines on a dark printed bag. Unless you specifically need the heft of a flagship-store bag, 250 gsm is usually the smarter ceiling.
Putting the spec together
Work in order. First, fix the quantity and let it point you toward a process: a short, colorful run leans digital, a bold-logo kraft run in the thousands leans flexo, a limited-color logo on kraft suits screen, and a large full-color premium run calls for offset litho-lamination. Second, decide whether the design truly needs photographic detail or gradients, since that requirement alone can rule out flexo and screen regardless of quantity. Third, choose the paper weight from the contents and the finish, defaulting to around 250 gsm unless the bag will carry very light or unusually heavy loads. Bring those three answers to your printer instead of only a logo file, and the quote you get back will match the bag you actually pictured, at a price that reflects the job rather than the fanciest process on the menu.
Leave a Reply